Creating a bootable medium - O&O DiskImage ToGo
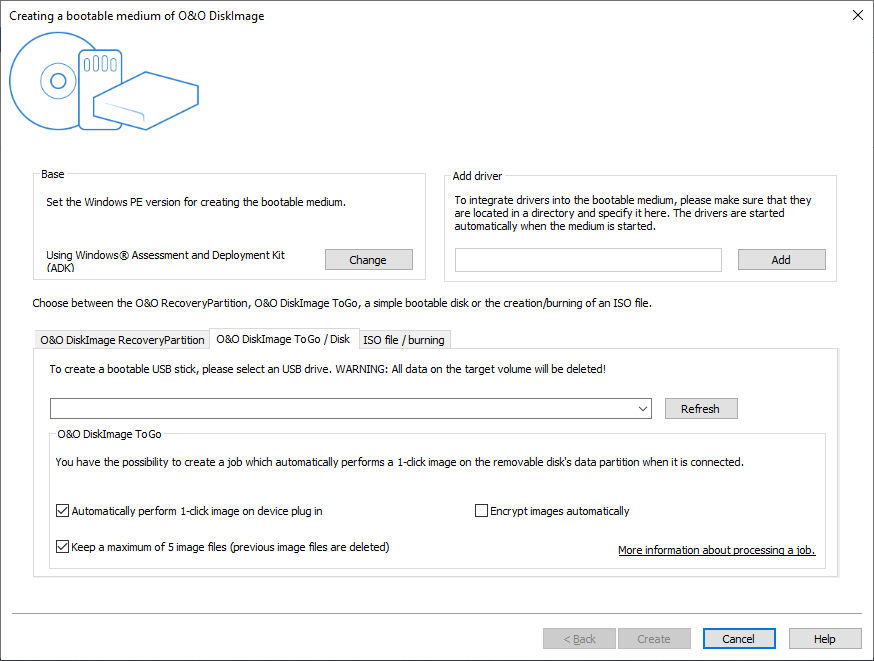
O&O DiskImage ToGo function automatically turns an external hard drive that you select to store an image on (or USB flash drive with enough storage space) into an O&O DiskImage boot medium, and marks this disk as the preferred storage medium for future system backups. As soon as you connect this external USB hard disk to your computer, O&O DiskImage automatically creates an image of all internal drives and the data partition onto it.
This makes it easy to create a recent backup. And, if something really happens to your computer or you want to transfer your system and all your data to a new computer, then with the O&O DiskImage boot medium you can restore the image stored on it with just one touch of a button, without the hassle of searching for the boot medium and the external hard drive with the backup.
Creating a bootable disk with O&O DiskImage is possible by going to the menu item Tools -> Create bootable disk. This feature detects those options available for creating a bootable disk within the system. It will then copy all the files that are required for doing this. To begin the process, click Create. Once this step is successfully completed, click Finish.
Change Windows PE version
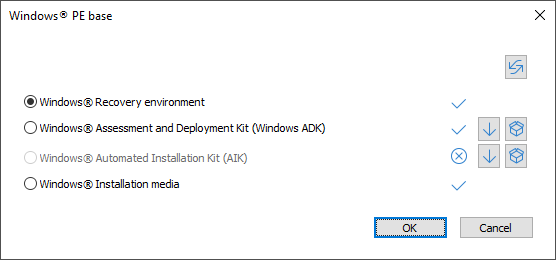
Choose Windows PE base
The current options available for creating will be identified with a blue check ![]() . Those options not available, because their components are either not installed or not recognized, will be displayed with a blue cross
. Those options not available, because their components are either not installed or not recognized, will be displayed with a blue cross ![]() .
.
When enabled, automatic prioritization guarantees that the best option for creating will be selected automatically. Select "Disable the automatic setting" if you wish to use another option. Once this is done, the various options available for creating will be displayed for selection.
![]() Open the respective Microsoft Download page for the ADK or AIK. The Windows ADK/AIK is rather large, taking up between 1.7 – 3.4 GB. The download can therefore take up to a few hours, depending on download speed.
Open the respective Microsoft Download page for the ADK or AIK. The Windows ADK/AIK is rather large, taking up between 1.7 – 3.4 GB. The download can therefore take up to a few hours, depending on download speed.
![]() Open the respective installation file (ADK/AIK) and start it.
Open the respective installation file (ADK/AIK) and start it.
The program will first try creating a bootable disk using the Windows® recovery environment. When this isn’t possible, it will use the "Windows Assessment and Deployment Kit (ADK) for Windows®". The Kit contains a combination of tools that can be used for personalizing, evaluating, and preparing Windows operating systems for use on new computers.
| Windows 10 |
If you’re using Windows 10, install ADK10. You can download the installation file on the following page: https://msdn.microsoft.com/en-gb/en-des/windows/hardware/dn913721.aspx |
| Windows 8.1 |
If you’re using Windows 8.1, install ADK8.1. You can download the installation file on the following page: https://www.microsoft.com/en-gb/download/details.aspx?id=39982 |
| Windows 8 |
If you’re using Windows 8, install ADK8.0. You can download the installation file on the following page: https://www.microsoft.com/en-gb/download/details.aspx?id=30652 |
| Windows 7 |
If you’re using Windows 7: The Windows® Automated Installation Kit (AIK) for Windows® will help you create a bootable disk. The "Windows® Automated Installation Kit (AIK) for Windows® 7" will assist with the installation, customization, and final preparations for operating systems from the Microsoft Windows® 7 operating system family. This can be downloaded from Microsoft® under http://www.microsoft.com/en-gb/download/details.aspx?id=5753 |
As a last option, you can use the Windows® installation disk to create a bootable disk. If this option is selected, the Windows®installation disk itself will need to be directly inserted.
Change removable medium
Select an external hard drive to store an image on (or USB flash drive with enough storage space).
On account of the limitations placed on creating Windows bootable disks, O&O DiskImage can only use 2TB for making a bootable medium. If your disk is larger than 2 TB, the remaining space cannot be used.
All data on the target volume will be deleted.