- When and how often should I make images?
- Which drives should I image?
- Where should I store my image?
- I just bought myself a new computer. If I take a complete image of my old computer, can I restore it to my new one?
- Do I have unlimited use of all functions with the trial version?
- When do I need the bootable CD from O&O DiskImage?
- How do I save an image to CD/DVD?
- Can I continue working during the imaging process?
- Can I change an existing image?
- I have created an image of several drives. Can I extract the image from just one of those drives and store it separately?
- What is the difference between a clone and an image?
- Why are temporary files created?
- What is the advantage of an incremental image?
- My incremental image is not smaller than my base image. Where does this file come from?
- What does "Drive cannot be locked" mean? Does this affect the data imaging?
- While cloning, O&O DiskImage reports that the target volume is too small although the source drive is smaller than the target disk. What is the reason for this?
- What do I do if O&O DiskImage takes very long to start, or doesn't even start at all?
- During restoration, O&O DiskImage created a new temporary file on my hard disk. Where does this file come from?
- Why are partitions that weren't imaged displayed when mounting an image in Explorer?
- Where do I find the domain and user name to use for authentication?
- Where do I find the computer name for, running activities?
- How can I check my access rights on the target computer or the target folder?
- Explanation of the Registry entries
- Behavior when receiving error notices
- Allocating objects
- Enable/Disable logging
When and how often should I make images?
We recommend imaging on a regular basis (at least once a month). The more regularly it’s performed, the more up-to-date the data contained within those images will be. As a guiding rule, you should always image an intact system.
Which drives should I image?
You should generally image all drives, meaning the system drive (Windows), primarily Drive C, and all remaining data drives where private and business data, e.g. customer data, photo collections or music are stored.
Where should I store my image?
Don’t save the image on the same hard disk where the imaged drive is located. It should be ideally stored on an external hard disk or a CD/DVD.
I just bought myself a new computer. If I take a complete image of my old computer, can I restore it to my new one?
Restoring data drives is not a problem even with differing hardware. However, system partitions can only be restored on differing hardware using the Start CD and the integrated M.I.R. You can read more about this in the chapter Settings for restoration on different hardware.
Do I have unlimited use of all functions with the trial version?
The trial version is not restricted – all program functions are fully operational.
When do I need the bootable CD from O&O DiskImage?
You will need the Start CD, if you want to restore your entire computer or a system partition. The Start CD can also be used, if the operating system doesn't start up anymore.
How do I save an image to CD/DVD?
- You must create an image file(s) and save it to your hard disk before you can write it to CD/DVD.
- When creating the image, under Drive imaging/Imaging options/File size, you should restrict the maximum image file size to the size of the intended removable medium where it will be saved.
- Should the image exceed the selected maximum file size, it will be split into several image files.
- You can then burn the image files to CD/DVD.
- Select Tools on the start page, then on Burn image file(s) and follow the instructions.
What do I do when my image is too big for a CD/DVD?
- If the Image you already saved to your hard disk is too big for the blank CD/DVD, you can, of course, still split the image file.
- Under Tools, open up Convert image file.
- Select the Image you wish to change by using Add.
- Merge incremental Images
- During conversion, one copy of the Image will be made while the original remains unchanged.
I have split the image and saved it on various disks (CD/DVD).
I want to:
- restore this image
- display drives from the image
- use the image as a base image for incremental imaging purposes
- merge incremental images
- convert the image file
Before you go ahead with any of the above named steps, we strongly advise you to save all parts of the Image in a folder on your hard disk. Please ensure the folder is not on the drive where you wish to restore the Image. Once you have done this you can complete the steps outlined above by simply following the instructions in the corresponding chapters of the User’s Guide.
Can I continue working during the imaging process?
You can continue working and making changes without any problem.
The working memory buffer is however restricted. You can see how much is available in the Memory buffer display. See Chapter "Lock a Drive".
Can I change an existing image?
Under Tools you can find the function Convert Image File. This enables you to change certain properties and contents of an existing image.
I have created an image of several drives. Can I extract the image from just one of those drives and store it separately?
Follow the instructions below:
- Under Tools select Convert image file.
- Select the image using Add and then select the drive you wish to separately image.
- Click Open and select a drive. After confirming with OK, click Start.
- After confirming with (OK) click Start.
- The old image remains unaltered.
What is the difference between a clone and an image?
Using the Clone drive function, you can make a 1:1 copy of a drive including all its stored data, without producing any image files. The storage volume /drive is saved directly without compression. The advantage of a clone as opposed to an image is that the detour through an image file is avoided. You can access the clone of a drive without having to restore the drive. You do, however, require a lot more storage space for a clone than for an image.
Important! When cloning your drive (source drive) the selected target drive will be overwritten. You should therefore save your copy on an external hard disk, either in an unused region or overwrite a previously selected drive purely for this purpose.
Why are temporary files created?
If you leave a drive unlocked during an imaging because, for instance, you want to continue working on that drive, the original status will be “cached”, i.e. stored in the working memory buffer. “Temporary files” are created in the process. The working memory buffer space is, however, limited. You can see how much space is available by looking at the memory buffer display.
What is the advantage of an incremental image?
An incremental image normally has a smaller data volume than a base image. In addition, you can identify the differences, more precisely, the changes made since the base image was created.
My incremental image is not smaller than my base image. Where does this file come from?
This can occur if you have, for example, defragmented your computer in the meantime. The newly structured file segments will then be recognized as “changes” and imaged as new files.
What does "Drive cannot be locked" mean? Does this affect the data imaging?
As a result of system processes having to be in constant operation, it's not normally possible for system partitions to be locked. You get this notification even when you want to image a data drive and this is directly integrated into the system processes. The notification doesn’t generally have an effect on the imaging process; it is still able to be run without a problem. To be totally sure, shut down all running system applications, e.g. defragmentation or cloning processes, before imaging.
While cloning, O&O DiskImage reports that the target volume is too small although the source drive is smaller than the target disk. What is the reason for this?
Make sure you haven’t selected the entire hard disk as your source. Example:
You have a hard disk with 100GB that is divided into two partitions:
- System partition (20GB)
- Data partition (80GB)
- While trying to clone the system partitions on an external 40GB hard disk, O&O DiskImage reports that the target volume is too small.
By just making a check, you can select the system partitions as your only source, and not the entire hard disk.
What do I do if O&O DiskImage takes very long to start, or doesn't even start at all?
Please read the note about System requirements and make sure you're using the latest versions of your drivers.
During restoration, O&O DiskImage created a new temporary file on my hard disk. Where does this file come from?
Before creating an image, O&O DiskImage normally deposits a number of metadata in a local file. This data is needed by O&O DiskImage in order to create the image. The file will be included in the imaging to assure consistency in the image. This file will normally be automatically removed during restoration.
Under certain circumstances, it's possible that another action of the operating system or the user will prevent this temporary file from being deleted. This will then result in the file remaining undeleted in the system. You can, however, delete this temporary file without any risk.
Why are partitions that weren't imaged displayed when mounting an image in Explorer?
In addition to saving data from the partition being imaged, O&O DiskImage also needs to save information about the disk on which that partition was originally located. All of this is required for mounting an image, converting it into a virtual disk, or performing any future restoration. There will also be information included about partitions that were not imaged. When mounting an image, just as when using a virtual hard disk after conversion from an image, Microsoft Windows uses this information to recognize that there were originally multiple partitions on the disk, and attempts to integrate them into the system. Because information/data about these partitions is missing, it's not possible to assign them to any file system. As a result, partitions that weren't imaged will be displayed as RAW, i.e., non-formatted.
Frequent questions on authentication
Where do I find the domain and user name to use for authentication?
If you are not sure, please proceed as follows:
- Call the command line under Run... in the Start menu. Enter the command cmd in the dialogue.

- Enter the command: echo %userdomain%%username% into the command line and confirm your entry with Enter. If your computer is not signed on to a domain, your computer name will appear instead of the domain name.

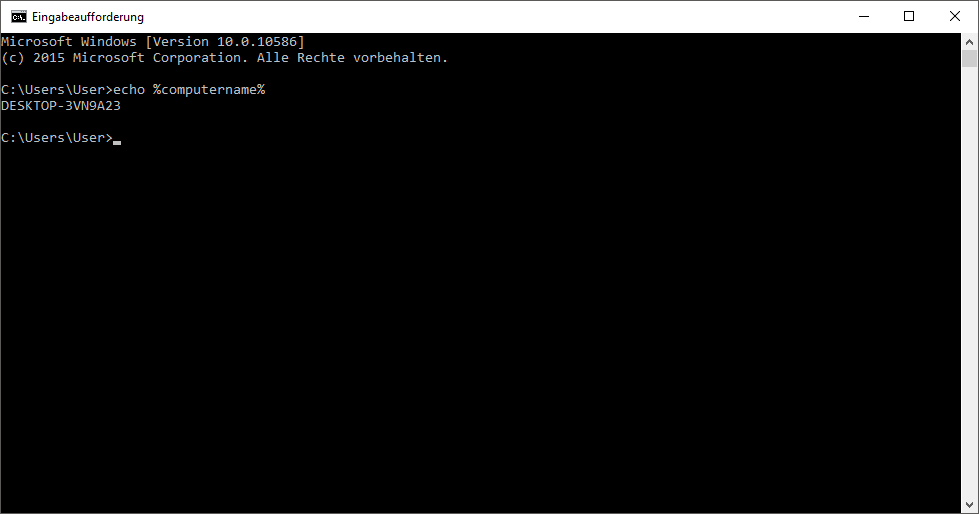
Where do I find the computer name for, running activities?
If you are not sure, please proceed as follows:
- Call the command line under Run... in the Start menu. Enter the command cmd in the dialogue.
- Enter the command: echo %computername% and confirm your entry with Enter.
How can I check my access rights on the target computer or the target folder?
If you are not sure if your entries are correct, you can view them under Program settings/Security and recheck them.
Alternatively, you can check your access rights on the target computer in the properties of the corresponding target folder under "Security" in Windows Explorer.
- Click in the context menu of the folder on Properties and then Security. All users with access to the folders will be listed.
Although I have already entered my authentication data for a network drive, I am asked once again for every activity.
It is possible that you are requested to re-enter your authentication data for an activity like the restoration of an network drive image. The reason for this can be traced back to Windows. Certain dialogs, e.g. the browser dialog are not originally from O&O DiskImage but from Windows. Because Windows doesn't have access to your O&O DiskImage authentication data, it is necessary to re-enter the access data for the selected drive.
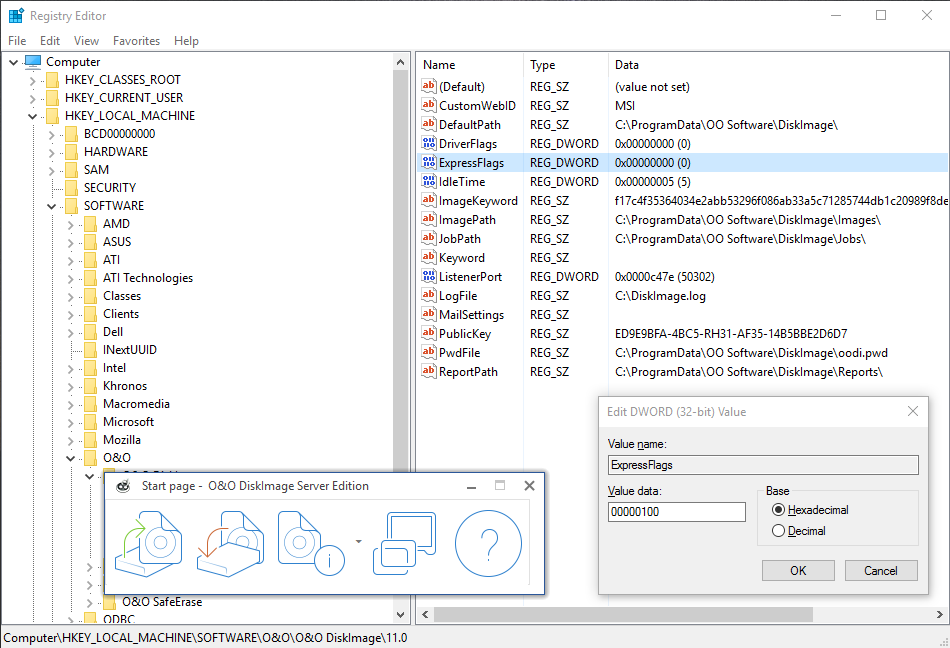
Explanation of the Registry entries
In the Windows registry, under HKEY_LOCAL_MACHINESoftware O&O DiskImage, you can configure certain settings for O&O DiskImage. Please note that changes in the registry can influence the functionality of O&O DiskImage and such changes will continue to be applied after restarting the computer.
| Name of the entry | Type of entry | Short description |
|---|---|---|
| ImagePath | String | Path to the storage location from the image files.* |
| JobPath | String | Path to the storage location from jobs.* |
| ReportPath | String | Path to the storage location from reports.* |
| PwdFile | String | Path and name of the password file |
| PublicKey | String | Public key for password encryption. Can be changed whenever needed. |
| NoSnapshotTmpFiles | String | This key is optional: it does not need to be set. If it's set, this key will influence the behavior of the snapshot driver during the creation of temporary files. In this way you can specify those drives where no temporary files should be created. The syntax for the value is: ;; (for example: c;d;e;) |
| Version | DWORD | Version of the type of image file. Current possible versions: 1 (up to and including version 4), 2 (current version)** |
| ExpressFlags | DWORD |
Optional key for disabling buttons in the Express view. This key can help administrators limit the functionality that is available over the interface so that users can only have restricted access to the program's features. If the key isn't set, all buttons are enabled. The DWORD values can be changed so that certain buttons in the Express are disabled:
|
* Can also be controlled over the user interface. If you're not sure, make changes over the user interface. There you can find additional explanations and selection options.
** The format of image files was extended in O&O DiskImage 4. In addition to the imaged data, checksums are placed in the image so that an identity check can be carried out for data inside the image. Older versions of O&O DiskImage do not recognize this extended image format and would label the image as invalid. To help older versions of O&O DiskImage work with images created by a newer version, the new version can create an image using the "old" format.
Behavior when receiving error notices
Various error notices may appear while working with O&O DiskImage. These can either be displayed in dialogs or seen in reports.
| Error notice | Description |
|
IDS_ERROR_LOGON_FAILURE Registration has failed on account of invalid user name or authentication information. |
User name and/or password is false. Where required, consult your system administrator. |
|
IDS_ERROR_ACCOUNT_RESTRICTION The authentication information entered is valid but restrictions on the user account have prevented a successful authentication. |
Change the settings of the respective user account. It's possible that there is a restriction such as "read only" enabled there. |
|
IDS_ERROR_INVALID_LOGON_HOURS The user account is subject to time limitations and is therefore not available for registration at this time. |
Maximum login time has expired. Please login again. |
|
IDS_ERROR_PASSWORD_EXPIRED The password for the user account has expired. |
Your password has expired. Please enter a new password. |
|
IDS_ERROR_ACCOUNT_DISABLED The account referred to is currently disabled and cannot be accessed for registration. |
User account was disabled. When applicable, consult your system administrator. |
|
IDS_ERROR_ACCOUNT_LOCKED_OUT The user account has been automatically blocked because too many invalid registration attempts have been made. |
User account was blocked. Where required, consult your system administrator. |
Internal error codes
The internal error code (individually designed error code) is the last digit in the error code after the last period.
| Error notice | Description |
| 0x385 | Invalid job or script. |
| 0x387 | Unsupported task or incorrectly written job / script |
| 0x388 | Parameter is false or is not supported by the task. |
| 0x38A | An obligatory parameter is missing. |
| 0x70 | Invalid or damaged installation. |
| 0x7D1 | Unknown Host |
| 0x7D2 | Invalid Host Port |
| 0x6A6 | Invalid password file |
| x6A9 | Invalid keyword in parameter (registry) |
| 0x6AA | No password file registered |
| 0x6AA | A target folder is missing in the password file. |
Windows errors / Microsoft error definitions (primary value)
| Error notice | Description |
| C0000240 | Prompting was cancelled |
| C0000022 | Access denied: process requires access to an object to which access is being denied. |
| C0000033 | Object (path/file) is invalid, e.g. is especially marked. |
| C0000034 | Object (path/file) not found |
| C0000035 | Same object (path/file) already exists. |
| E0040702 | An image file was changed or is located on a defective medium. All data could not be read. |
| E0040703 | An image file is defective, reading the data is not possible. |
| E0040704 | The target selected is too small. Please correct the source-target linkage. |
| E0040705 | An image file from an image chain does not exist or cannot be found. |
| E0040706 | Completion of an incremental image is not possible. Please create a new base image or combine the image files. |
Allocating objects
When cloning or restoring an image, the source and target can be linked differently. Source is the name for a drive or disk that is being restored from an image or that has been used as the base for cloning.
Terminology
- Disk: A hard disk or disk in general that contains one or more drives.
- Area: An area on a disk. It may be empty, contain disk information (MBR, GPT, LDM) or belong to a drive.
- Drive: A partition or a volume that is found on one or more hard disks.
Source and target may be linked in the following combinations:
| link from | to | |
|---|---|---|
| 1. | Source disk | Target disk |
| 2. | Source disk | Target drive |
| 3. | Source disk | Target area |
| 4. | Source drive(s) | Target disk(s) |
| 5. | Source drive | Target drive |
| 6. | Source drive | Target area(s) |
| 7. | Source area(s) | Target disk |
| 8. | Source area | Target drive |
| 9. | Source area | Target area |
Enable/Disable logging
If errors occur while creating or restoring images under Windows, enable logging in O&O DiskImage and try repeating the operation to see if the problem reoccurs. Logging can be turned on and off starting from O&O DiskImage 8:
Open O&O DiskImage, click the arrow at the top right next to the Help button and select Enable logging. This will restart the O&O DiskImage service and can take up to two minutes.
When the error reoccurs, send us the O&O DiskImage log file: click the arrow next to the Help button and select Save support information....
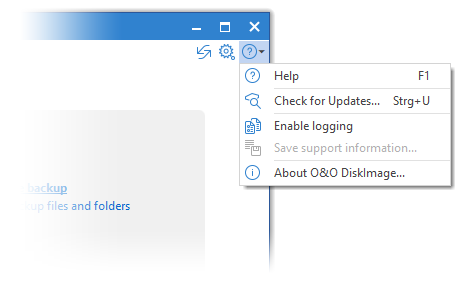
To disable logging, click the Help button at the top right and select Disable logging. This will restart the O&O DiskImage service and can take up to two minutes.