O&O SafeErase integrates itself into your Windows Explorer. You can access O&O SafeErase via right-clicking. Select one or more deletion objects and right-click them.
- The entry Securely erase allows you to start O&O SafeErase.
- After selecting the deletion method you can start the deletion with Securely delete now.
Securely delete files and folders via right-clicking
To delete files or folders, right-click on them and select Securely erase – exactly like the Windows entry "Delete".
- O&O SafeErase will then ask you to proceed selecting the deletion method. More about this can be found in the chapter regarding Deletion methods.
- Securely delete now starts the deletion process.
If you would like to delete more than one file, hold down the 'Ctrl' key and highlight the files with the left mouse button.
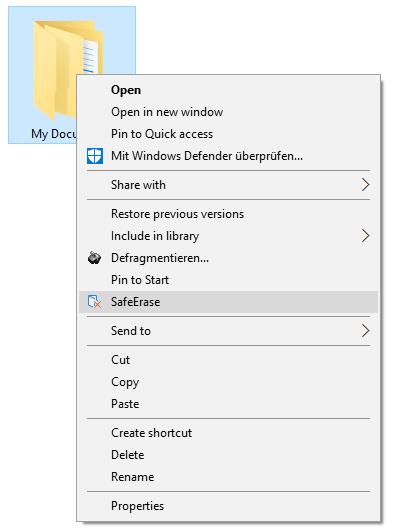
Context Menu (via right-clicking) to securely delete files and folders
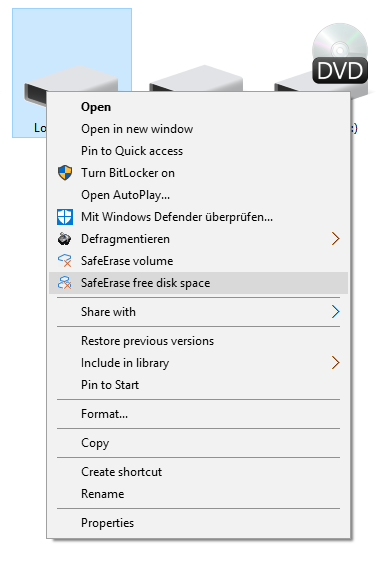
Securely delete a hard disks/partitions via right-clicking
Simply find the partition in Windows Explorer you would like to securely delete and right click on it.
- Select the menu entry Securely erase volume.
- O&O SafeErase will then ask you to proceed selecting the deletion method. More about this can be found in the chapter regarding Deletion methods.
- Securely delete now starts the deletion process.
Please bear in mind that this process might take up some time depending on the deletion method and the size of the partition.
After the partition has been permanently deleted it is necessary that you reformat the partition in order to use it again. More information about the formatting of a hard disk drive can be found in the Window's Help file.
Securely delete a hard disks/partitions via right-clicking
Securely delete data later by right-clicking
Data deleted with Windows does still exist on your computer. Windows makes these areas available to be rewritten as free space on the hard disks. To make sure that all old deleted data cannot be restored anymore, delete the free space with O&O SafeErase.
- To do this, select the function Securely erase free disk space by right-clicking on the drive where you would like to wipe the free space.
- O&O SafeErase will then ask you to proceed selecting the deletion method. More about this can be found in the chapter regarding Deletion methods.
- Securely delete now starts the deletion process.
The higher the level of security and the more free space for deletion, the longer the deletion process will take.
No existing files or data will be deleted, rather specific pieces of data that are marked free on the hard disk. After this process has been completed, you will not longer be able to restore this data ever again.

Context Menu (via right-clicking) to Securely delete free space
Securely delete data from the Windows Recycle Bin via right-clicking
Select the Recycle Bin and right-click on it to view the context menu. There you can click on Securely erase (empty) Recycle Bin.
- O&O SafeErase will then ask you to proceed selecting the deletion method. More about this can be found in the chapter regarding Deletion methods.
- Securely delete now starts the deletion process.
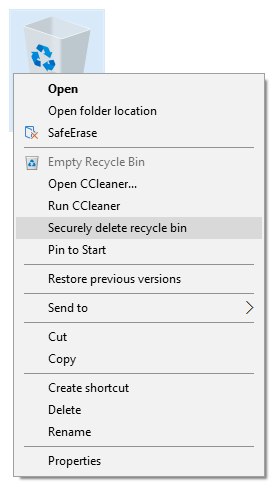
Via right-clicking for Recycling Bin with securely delete Option
Windows diverts only a set amount of disk space to the Recycle Bin. When the total size of it files excess this set amount, the oldest data are deleted. This deletion method, however, is still the Windows' standard and therefore not secure. In case files were deleted from the Windows Recycle Bin, this function would be the only possibility to make sure they were securely overwritten.